
GSB 5.154


Room Capabilities

Ethernet, LCD Projection, Laptop Computer Connection, Auxiliary Inputs, Whiteboards

Controls

Mounted to the wall is a control panel with outlets for your computer and auxiliary devices. Computer audio, Ethernet, and external Video connections are available, but only the computer VGA (video) cable is supplied in the room. If you bring your own cables for Ethernet or audio, they should be about 15 feet long. These cables are available for checkout from Media Support.

LAPTOP COMPUTER PROJECTION

Connect the VGA cable (attached to the wall panel) to the VGA port of your computer. If you have audio in your presentation you will also need to connect a PC audio cable (PC Audio and Ethernet cables are available for checkout from ) from your computer to the PC audio jack located underneath the VGA connection. Turn on your computer, press either the right or left Projector ON button, press the PC button and your computer monitor will be displayed on the projection screens. For more information please see the Laptop Projection Instructions below.
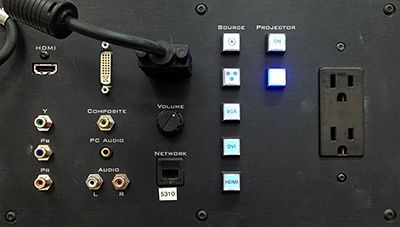

Note: Before using any application that accesses the University network through either a public Ethernet or wireless port, you must first open an internet browser application and login to the page that you are automatically directed to with your UTEID. If you have forgotten your UTEID, please visit the UTEID Self-Service Tools page for assistance. 

Control Panel Operation

VOLUME

The volume knob adjusts the overall volume for the PC and video sources. Additional volume adjustments for your laptop PC may be done on the computer itself.

PROJECTOR

  • The Projector ON/OFF buttons control the LCD Projector. It can take 5 minutes for the projector to warm up and begin to display.
  • The Source buttons switch between the available sources. The top button switches to the Composite source, the next button down controls the Component source, the next three buttons control the VGA, DVI and HDMI sources.
 
GSB 5-153

Laptop Projection Instructions

    • The room has power outlets, PC Audio and Ethernet (UT network and internet access) jacks, and a built-in VGA video cable to connect your laptop to the LCD Projector.
    • Connect the VGA cable (attached to the wall panel) to the VGA port of your computer. If you have audio in your presentation you will also need to connect a PC audio cable (PC Audio and Ethernet cables are available for checkout from ) into the PC audio jack located underneath the VGA connection.
  • Turn on your computer, press either the right or left Projector ON button and press the PC button and your computer. If your laptop's screen appears on the room's screen you are ready to go, if not, you may need to mirror your laptop's screen onto the projector. To do this on a Dell computer, hit the FN and F8 keys at the same time until you see your laptop content on the screen. Hitting FN-F8 successively will scroll through the available viewing choices. The command to mirror your laptop's screen may be different on other manufacturer's computers, if you have any questions please consult this Laptop Activation Chart.
  • Note: Before using any application that accesses the University network through either a public Ethernet or wireless port, you must first open an internet browser application and login to the page that you are automatically directed to with your UTEID. If you have forgotten your UTEID, please visit the UTEID Self-Service Tools page for assistance.