GSB 3.104
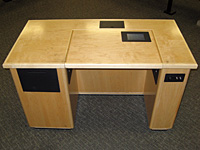
Multimedia DeskCAPABILITIESCONTROLSOn the top of the desk there is a computer interface screen, touch the screen and it will turn on and display the control interface. LAPTOP COMPUTER PROJECTIONConnect the desk's VGA cable (attached to the desk under the black plate at the top rear of the desk) to the VGA port of your laptop computer. Turn on your computer, press the Projection On, and PC buttons on the desk's touch screen. The desk also has computer audio and Ethernet jacks, as well as two AC outlets. Note: Before using any application that accesses the University network through either a public Ethernet or wireless port, you must first open an internet browser application and login to the page that you are automatically directed to with your UTEID. If you have forgotten your UTEID, please visit the UTEID Self-Service Tools page for assistance. VIDEO PLAYEROn the front left leg of the desk is a slot-loading DVD/CD player. The controls for this unit are available on the desk's touch screen. |
|
Desk/Lectern Operation
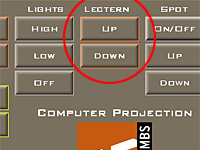
Press and hold the Lectern Up/Down buttons on the desk interface to raise and lower the desk to your preferred height. |
|
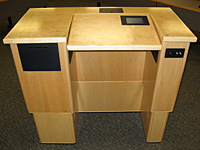
Laptop Projection Instructions
|
 |
Video ProjectionPROJECTION ONTurns on the left or right projector. To turn on both projectors, push both On buttons. While the projectors start up, the Projection Off button may be blanked out for up to 2 minutes. PROJECTION OFFTurns off the left or right projector. To turn off both projectors, push both Off buttons. The projectors will wait 90 seconds before they can be turned on again after they have been turned off. PROJECTOR AUTO-ADJUSTThese buttons will auto-adjust the screen image. |
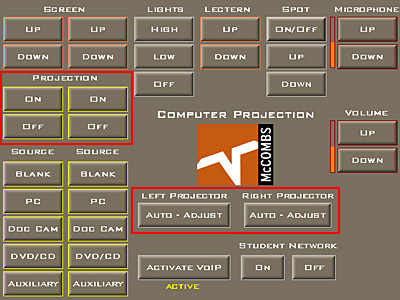 |
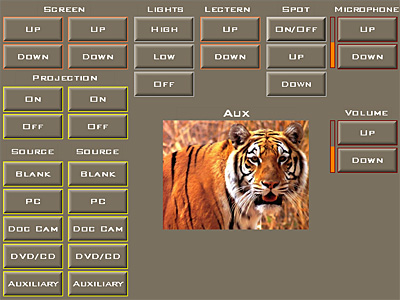
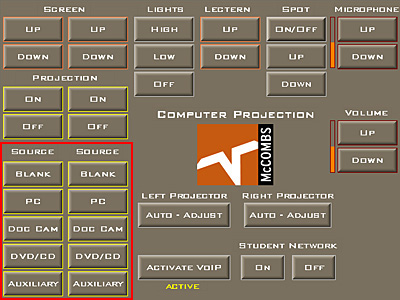
Source Selection
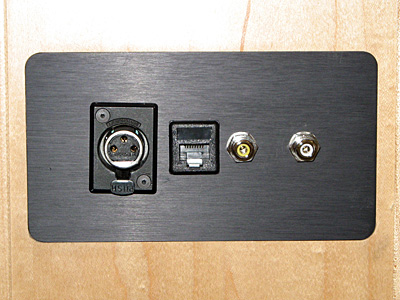
BLANKBlanks the image on the projection screen, so that the audience cannot see the projected image temporarily. This button will not turn the projector off. PCSelects the Laptop PC input to be displayed on the screen. DOC CAMSelects the ceiling-mounted document camera input to be displayed on the screen. DVD/CDSelects the desk's slot-loading DVD/CD player to be displayed on the screen. This button also brings up the DVD/CD controls in the center of the touch panel interface. AUXILIARYSelects the RCA inputs on the desk's auxiliary input panel for display. The yellow input is for video and the white input is for audio. Cables for these inputs are available for checkout at the Media Support office. There is also an XLR connection where you can plug in an external microphone (microphones can be checked out at Media Support). |
 |
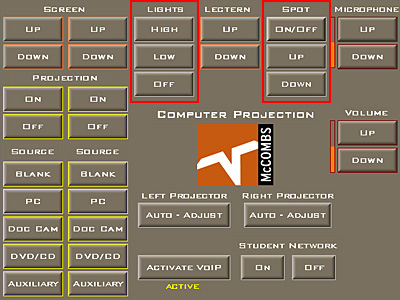
LightsLIGHTSThese controls turn the ceiling lights on or off, and adjust their brightness. SPOTTurns the lectern spotlight on or off, and adjusts its brightness. |
 |
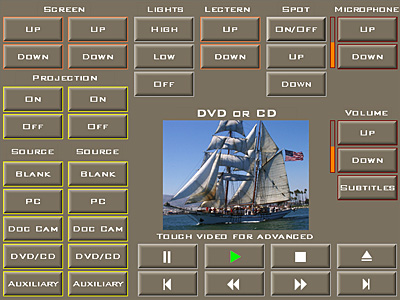
Volume, Microphone, Screen and Lectern ControlsSCREENRaises and lowers the projection screens. To stop the screen at any point, press the button again. LECTERNRaises and lowers the desk to allow for desk or lectern use. MICROPHONEThe Microphone Up/Down buttons adjust the microphone volume (microphones may be checked out at Media Support). VOLUMEThese controls adjust the overall volume for the PC, DVD, and Auxiliary sources. Additional volume adjustments for your laptop PC may be done on the computer itself. |
 |
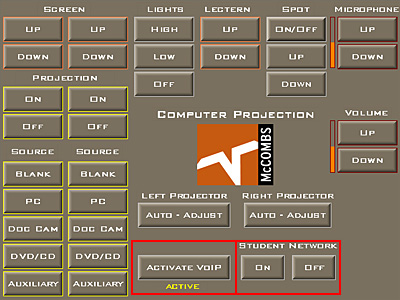
Voice Over IP (VOIP), Student NetworkVOICE OVER IP (VOIP)Please contact Media Support to set up a VOIP session. STUDENT NETWORKThese buttons control the student's desk's Ethernet ports. |
 |
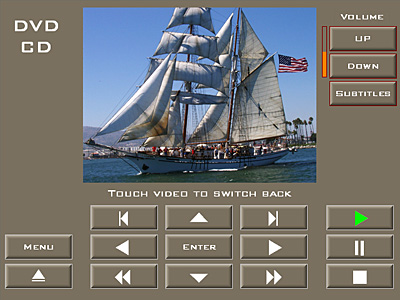
DVD Controls
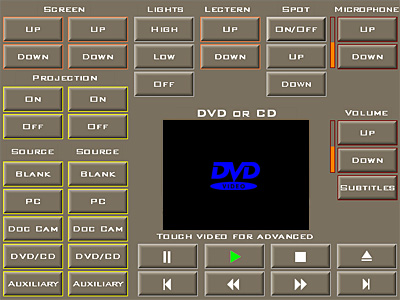
DVD INSTRUCTIONSTo use the DVD/CD source, Insert your DVD disk into the slot on the left leg of the desk and press the Projection On and DVD/CD buttons on the main interface. The DVD can take up to a minute to load so please be patient. DVD CONTROLS - Main Screen InterfacePress the triangular play button to play the DVD. The square button stops the DVD, the button with two vertical lines pauses the DVD, the arrow buttons with vertical lines skip to the next or previous movie chapter, the double triangle buttons fast forwards or reverses through the movie, and the triangular button with a line underneath ejects the DVD. The Subtitles button brings up the subtitles menu, and repeatedly pushing the button cycles through your available language options. DVD CONTROLS - Full Screen InterfaceFor additional DVD controls, touch the image on the main screen interface to bring up the full screen interface. On this page you have additional DVD controls. The Menu button goes to the DVD's main menu. The triangular arrow buttons in the North, South, East and West positions navigate through a DVD disk's menu options, and the Enter button selects the DVD option that is highlighted. The Menu button returns to a DVD disk's main menu. VOLUMEAdjusts the overall presentation volume. ERROR EXPLANATIONSAn icon shaped like a white circle with a diagonal line through it indicates that the DVD player accepted the command that you issued, but the DVD disk does not allow it's execution (e.g. trying to skip the FBI warning on a movie.) "No Disk" indicates that the DVD player cannot recognize the disk. Try ejecting and re-inserting the DVD disk. |
Main Screen Interface Full Screen Interface |
CD ControlsCD PLAYER INSTRUCTIONSInsert your CD disk into the slot on the left leg of the desk and press the DVD/CD source button on the main interface. It is not necessary to turn the projectors on for an audio-only CD. The CD can take up to a minute to load so please be patient. CD PLAYER CONTROLSPress the triangular play button to play the CD. The square button stops the CD, the double arrow buttons fast-forward and rewind the CD, the button with two vertical lines pauses the CD, and the triangular button with a line underneath ejects the CD. VOLUMEAdjusts the overall presentation volume. |
 |
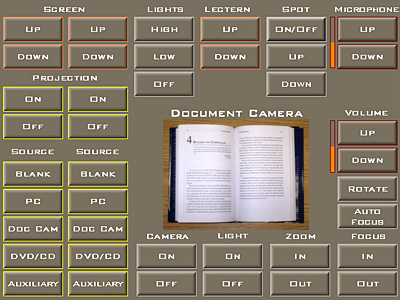
Doc Cam (Document Camera) ControlsDOCUMENT CAMERA INSTRUCTIONSTo operate the Doc Cam source, press the Projection On, Doc Cam and Camera On buttons on the main interface. DOC CAM CONTROLSThe Document Camera is mounted in the ceiling, and it films the desk surface and whatever document you have placed on it. If necessary, you can hit the Light buttons next to the Camera buttons on the interface to control the illumination of the Doc Cam area. Use the Zoom buttons to zoom the camera on your document. The Auto Focus button will focus the Doc Cam on your document. If necessary, hit the Focus In or Focus Out buttons for fine tuning. The Rotate button will rotate your image onscreen. |
 |
Aux (Auxiliary Input) ControlsAUXILIARY SOURCE HOOKUPThe Auxiliary button selects the two front panel RCA inputs, the yellow input is for video (adapter available at the Media Services office) and the white input is for audio. Hook your auxiliary source (such as a video camera) into these inputs. AUXILIARY SOURCE INSTRUCTIONSTo operate the Auxiliary source, press the Projection On and Auxiliary buttons on the main interface. Operate your auxiliary input source (such as a video camera) as you normally would and its signal will be displayed on the room's LCD projector screen. |
Main Screen Interface Auxiliary Inputs |